Just a bit late with this one… but it’s here at last!
So, where did we leave off? Right, Body work.

With all the body work done, all that was left to bring the car back home was dealing with a few mechanical gremlins and getting all the wiring buttoned up. A new brake master cylinder was in order, and replacing some of the power steering hoses too. After getting the car sorted out enough to drive, it was time to break in the new diff, which was insanely clunky! I’ve read up on these Kaaz diffs before and knew they were noisy, especially before break-in. So, I held my breath, hoping the clunking would go away once the break-in procedure was done. After doing figure eights for 30 minutes as required by the Kaaz instructions manual, the noise was absolutely no different.
The diff worked alright, and I can attest to that, as I might have gotten a bit pissed off and wanted to see if it was actually working as it should lol. After a bit more research, it seemed a lot of people experiencing the same problem had not been using the correct diff oil/friction modifier. So, I grabbed some new Motul Full synthetic diff oil and some Ford Motorcraft LSD friction modifier. And that did the trick! The clunking was still there but 60% quieter, and only at high turning angles.

Fixing the diff was a huge relief, as that’s probably one of the hardest parts to get in a timely manner, and by then I was starting to run pretty tight on time. I only had a month to get the car ready, but due to a holiday being right in the middle of my deadline, I had to get any work done by a shop ASAP. With that, I took the car to the electrician to get all the wiring I needed done. It wasn’t too much work, but I’m fairly inexperienced with this sort of stuff, and being on a deadline, I didn’t feel like learning while on a time crunch. The few things I needed done were:
-Hooking up the electrical system for the air cups; getting power from the battery all the way to the trunk, and running all the sensor and compressor wires.
-Getting power to the gauges. I planned on adding some engine monitoring gauges and I’d already gotten the sensors hooked up; they just needed power to get them working.
-Lastly, the Pivot RHU-M headlight controller. This one was a bit tricky, as I had to translate and look for more info on the installation online. But I managed to find enough to help the electrician install it, no problem.
With those things done, I went back to the body shop for what I thought would be the last time. I only had to clean up a few things and wanted them to mount my trunk board where all the air cup components would stay. The board came out really nice, and all that was left was securely mounting it in the trunk. The plan was to insert some rivnuts so it’s easy to remove in case I needed to service any components, but due to lack of time, the shop decided to unfortunately make the unwise decision and use some body fasteners straight through the spare tire well. Least to say I wasn’t happy about that, and it wasn’t how I wanted the work to be done. I eventually let go of it and agreed to come back to get the board mounted the way I wanted at a later date. Once everything was done, I wanted to drive the car back home for its first real test drive on the highway, since I had already gotten the insurance renewed and was good to go. The car made it through the 40-minute drive no problem! And felt as good as I’d hoped. The 326 coilovers were stiff but absorbed bumps fairly well; the car was still at monster truck height but it made me feel very good about my choice to get them.


After getting back home, I noticed something wasn’t set up correctly in the air cups system and decided to take it out real quick to fix it. As I started unscrewing the fasteners, on the last one, the smell of gas started leaking out… it turned out they used a tad bit too long of a fastener and screwed it right into the gas tank?!? I was fuming and made a call right away to the shop. By that day, it was only two days till all shops closed, and I was almost all out of time. They agreed to drop everything else and prioritize getting my tank fixed, so I dropped the car off the next day, and they had it fixed the day after that. They dropped the fuel tank in a day, had the hole welded shut, and installed it back in. It sucks when something like this happens, as that shop I had grown trusting of. But an experience like this would surely leave a bad taste. Nevertheless, I was happy to just get my car back in time for the holidays, so I can work on it at home.

As everyone took off work, I did not, since I had to leave for a few days off work. I needed to put in the extra hours at my job during the holiday, and would go back home to work on the car right away. With only the interior and getting the fitment dialed in left, I did not hesitate to get straight into it. The interior was not too difficult, starting with taking all the seats out and installing the first new part, The Miracle Cross Bar! Installation was surprisingly a breeze, getting it done in around less than an hour.


After that, cleaning the interior with everything out was a good opportunity to take advantage of. And then going through the list of my accessories and parts, ending with the two new, driver and passenger seats.


Parts I did not expect to have for my car at this early of a stage. When I first started working on the car a few months ago, the plan was to run only one bucket seat and keep the passenger seat stock. I had sourced a Bride Zieg II to use for the driver’s side. But somewhere down the line, I came across a Bride Zeta II prototype; which comes in Carbon Kevlar, for an absolute deal. And I couldn’t resist buying it. I then started debating whether to run one frp and one Kevlar seat or just one seat and keeping the other stock. And I kept racking my brain trying to decide. That is until something caught my attention on Yahoo Auction. And that was a first-generation Bride Gardis Kevlar bucket seat. It was the first time I had ever seen one for sale, and I just knew I had to get it! There was a tough bidding war last minute but I’m happy to say I won without too much of a loss. With that purchase, the seat setup was decided; I would be running two old school Bride bucket seats in Kevlar, and god what a beautiful sight that is!


The seats are a huge aspect of all builds, and I had always planned to do something similar to this, but this was a whole different level, because right after I received the seat I decided to inquire online and try to find more info on it. When I decided to bid on it, I knew that it had to be rare, but I did not know the extent of that. Apparently, the seat is potentially one of five or six in the world. As it was sold with JTCC racing in mind and a price tag of $6500 USD brand new! Safe to say Bride did not sell too many of those back in 1996. Finding all that out, I was ecstatic, especially for how good of a deal I got relative to the selling price when the seat was new.


And some edited photos of the process by my brother:


With that, I had one baller ass seat setup ready just in time for OFFSET. Which is the show I was working so hard hoping to pretty much reveal the car at, the show was on April 20th-21st in Dubai. And since the car would have to be shipped there, I had to get it ready at least two to three days in advance.
With the seats being the last part of my interior tune (for now), I lifted up the car on jack stands and started tackling the coilover height. Of course, nothing is as easy as I’d hope. With the rear giving me trouble right away. If you remember in the suspension post, I had to compress the rear helper springs all the way up to give the upper arms enough room between them and the shock collar. Well, as soon as I started to wind up the coilover mount, the arm began to contract the collar again, with the only way to fix that being removing the helper springs and winding up the collar higher to clear the arms. And to do that, I had to take the coilovers out. Which is a very easy job on S13s… except if you don’t want to take the side trunk panels out, or cut them to make the hole accessing the strut bigger, and having a thick cross bar bracket in the way definitely does not help. Let’s just say those two top strut nuts are a bitch. And I had to take them on and off that day like 5-6 times…


Anyways, the rear took some time to figure out, but I eventually got it done and ended up bottoming out the mount, getting the car as low as possible on the rear. The front was less challenging. I thought adding the helper springs in the front would add spme extra lift from the air cups, but the car ended up being way too high, so I took them back off and, bottomed out the front mounts as well. The front ended up being a bit higher than I’d like. So I ended up ordering shorter springs that I’ll install sometime in the near future. With the coilovers lowered and air line hooked up, the car was ready to be lowered back on the ground and go for its first test drive!
Thanks to the air cups, placing the car back on the ground wasn’t as much of a hassle as it would’ve been. Once it was on the ground, the car looked easily a thousand times better!


Not going to lie… I got a bit emotional lol.
Seeing all the hard work finally pay off felt good, I was pretty much done, and only a day away from the scheduled pick up date for the car, I had a few things I still needed to address, but all were minor things that could be done at a later date. I took the car out for a test drive with it at its lower ride height and tested out the cups; thankfully with it raised, I had no issues exiting the garage. The extra lift was just enough to clear the slope without any scraping. While the car is lifted it’s as expected super stiff and bumpy. But as soon as I air out the cups it’s pretty solid. Even at the lower height, the shocks still absorbed the bumps well and had no issues bottoming out on big humps. I didn’t end up driving too far though as the car needed an alignment bad! The rear toe was so out of whack the car wasn’t even driving straight!
So, I drove it back home right away and called it a day. Next day I decided to make a last-minute decision and change the wheels for the show. I was going to stick with the AVS Modal 5s I’ve had on it since I swapped the 5 lug hubs on. But the finish on those left a bit to be desired, especially with how well everything else came out, I wasn’t too happy with their condition. The color also felt a bit too dark and didn’t really suit the style I was looking for. So, I had a set of 17×9+17 Work Cr Kai that had brand new paint from the previous owner, the finish was done in bronze that was a bit darker than the original Work one, but it was in a lot better condition so I switched the tires real quick between them. The front looked amazing but the rear was a bit sunken in, that was solved with some 15mm spacers I got later on.


I also added the RPS13 Kevlar garnish, and got my display plates ready.


With that, the car was ready to be shipped off, had to take a few photos at the neighborhood spot as usual beforehand of course.


I was absolutely enamored with the results, felt crazy to finally see my own car similar to all the ones I’ve loved and geeked over for the past years. Later that night the truck came by and we loaded the car in. The trip from Riyadh to Dubai is around 10-11 hours by car, but I knew the truck would be making a few stops and travel a bit slower of course. I had booked my flight later in the evening the next day, in hopes of meeting the truck driver somewhere near my hotel to pick up the car and use it to get around Dubai and not have to rent or take cabs out there. Unfortunately, that plan was not coming to fruition, as some of you might have seen, the UAE had unbelievably experienced the heaviest rainstorm it has in 75 years, the amount of rain that fell within those next two days was bananas! The roads were flooded, the airport was underwater. And no one or anything was going in or out of the country. My flight got rescheduled 2 days back. And I was only able to get there on Thursday instead of Tuesday.


My car, however, arrived the night of the big storm on Tuesday, and since I wasn’t there to pick it up, the car stayed in the truck, thankfully the truck driver was able to drive out of Dubai before the heavy rain came down and went to a safer area to spend the next few nights. The truck driver dropped the car off at the show venue on Thursday afternoon and was picked up by the team at OFFSET. I arrived later in the day to the busiest airport I’ve ever been to, the flight landed at 8 pm and we couldn’t exit the plane until 10 pm, the airport was super short staffed and running on life support. The line for taxis was insanely long but I was able to hitch a ride and get to the venue eventually. I was hoping to make it in time to get to an alignment shop, as driving anything over 40 km/h felt very sketchy. All shops in the area were either closed or had damaged alignment racks from the floods. In the end, I was able to borrow a floor jack from a friend and did a quick and dirty eye alignment, which was good enough to last me the week driving around Dubai. The front was super toed in but it drove good enough to not be dangerous. Friday was all spent prepping for the event, I went and got the previously mentioned 15 mm spacers and installed them, gave the car a proper wash, and applied all the stickers in the parking garage where the event took place. Just sorting out the rear fitment made the car look a lot better. I parked the car in my spot and hung out for the rest of the night chilling with old and new friends.


Saturday and Sunday were the days of the event. the caliper of cars there was amazing, only the best cars in the Middle East get accepted into the event. There were all styles of builds, with the only thing in common between all of them was that every single car was done well. No half-assed, mediocre builds with cheap/replica parts. Every single car there had a passionate owner behind it; they wanted to showcase all the hard work and time they’ve invested into these cars, some cars have been builds in progress for years, and for some, this was their first public unveiling. Every single car was special in its own way, and that’s something you wouldn’t find anywhere else.
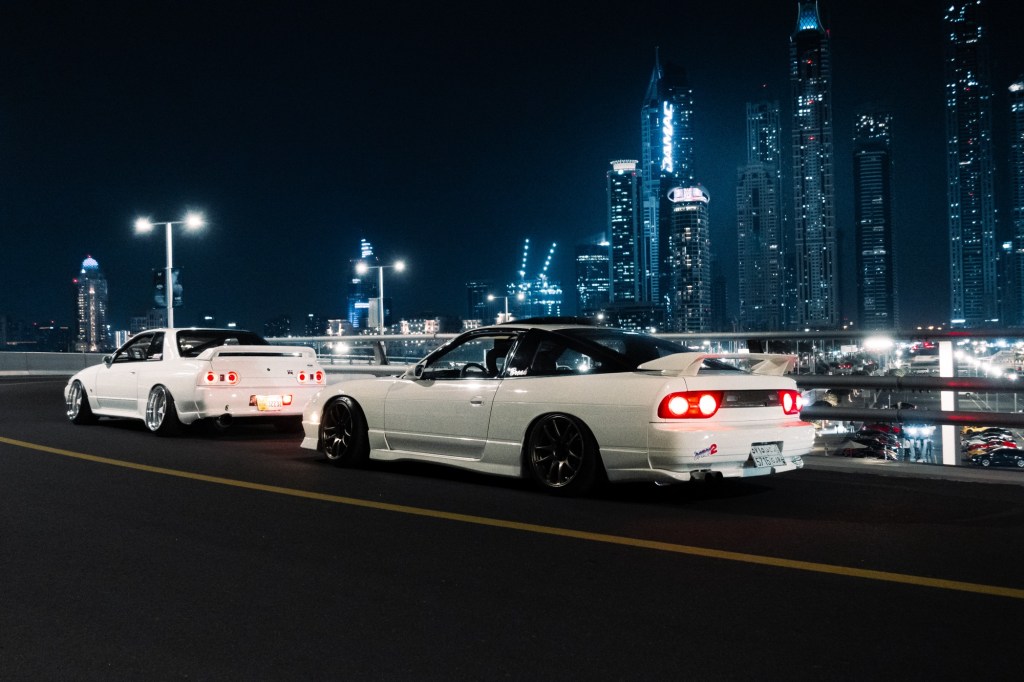
I made lots of new friends there, all incredible people who share the same love for these pieces of metal we cherish so much. One of those people was my friend Ali, the owner of one of my favorite R32 GTRs, our cars had a very similar look, with mostly OEM body parts and early 2000s styling cues all over. He was kind enough to spend Sunday night after the show shooting our car together, which were easily the favorite photos I shot from the whole trip, the spot we went to was something straight out of Wangan Midnight or Gran Turismo, an overpass with an incredible skyline view in the background. Here are those photos, plus some of the best shots I took at the event:


I was spending a week in Dubai, so after the show was done I was able to just chill out and enjoy driving the car around the city, later I met up with my other friend also named Ali, more famously known online as @dorisoul/@tireplague. A real talent and passionate dude, the edits and videos he makes are incredible and he was kind enough to give my car special attention and film it for a few hours, even made me my own Machine Check!
All of his videos can be found on his creative IG account, here is the link to that:
https://www.instagram.com/tireplague?igsh=bzV3ZDNyczQ5aXNz
Huge thank you to him and his friends for the assist during filming and just hanging out. Had a great time with all of them!
We continued to chill out till the end of the week, I did have hopes of going part hunting in the industrial areas of Dubai and Sharja, but due to the floods that wasn’t going to happen, I did however visit a wheel shop I’ve been a customer of for years, and found a bunch of stuff I liked, came back home with two new sets of wheels and a single 14×16 F1 wheel lol. On the last day there I packed up the car and sent it on its way back home. with me leaving in the evening to go back home. Thankfully by then the airport was back in working order and I had no issues getting back home. The car arrived later the next day all safe and sound.
There is another month of stuff that happened between the trip and me writing this, I came back home in time for finals and was more focused on school which is why this post was delayed more than I’d hoped. I did do some work on the car but nothing too crazy. I do plan on changing things up a bit before next season, but I’ll get into that in a later post.


One of the wheel sets I picked up in Dubai was an 18in set of Modal 5s, with that I could live my 180 17/18 dreams, I did an alignment and ordered some rear tires as soon as I got home and got the new 18s and my 17s paint matched and ran those, the rears took some work to make them fit. The set I got was 18×9 and 18×10, I really wanted to run the 10js so I had to pull the fenders a bit more and struggle with some spacers to keep the rim from contacting the inner tire well. I also lowered the front half an inch by removing the lower collar on the coilover, I still need to install the shorter springs but this was before I got them. I changed up the window stickers, and added a few more and I’m happy with the result. I also took the dash mat out and removed the cloth on the door cards, these are only temporary solutions as I plan on getting into the interior a bit more this summer.


At last this is the car’s current look, looks and feels good, a bit underpowered as I found out at the track. But that was to be expected. A 4.3 or 4.6 diff might be a good investment. But we’ll see what the future holds.


Thank you for reading, hopefully from now on the blog posts will be more often but shorter. But don’t hold your breath as I might have to do another trip blog lol.
-Malek

Leave a comment